Web & Domain FAQs
Whilst it’s a straightforward process – we do like to take care to ensure downtime is minimised and there’s no disruption to crucial services such as emails.
1. Set up a copy of your site on our server
We set up web hosting space on our server and ask you to provide a full copy of the site and (crucially) the database export file. You can do this by
- sending the file package across via email / WeTransfer
or
- Provide us FTP access to your website where it is presently hosted – we can download a copy and upload it to your new server space for you.
! Remember not to update your website with new copy, pictures etc from this point onwards
2. Test the site on its new server
Once it’s fully uploaded, we test the site but don’t worry – it’s not live to the world yet!
We test:
- All site pages
- Links – internal and external
- Web forms – we confirm they are going to the places you want them to
3. Point the domain to the new matm Server
In order to do this – we need to update the DNS settings on your domain. This can be done in one of two main ways
- matm update the DNS settings by logging into your domain control panel. You provide us with Username and password. We do the rest
or
- matm provide you with the changes that need to be made and you or your IT representative make the changes in your domain control panel.
4. What happens next?
Over the next 24-48 hours, visitors will begin seeing the new (matm-hosted) site rather than the previous one. This is called DNS Propagation.
If everything goes smoothly – no one will see any disruption in service, although we never say never. Some configurations of larger internal networks can occasionally cause some people to see the old site for a while through caching.
We advise keeping your IT team in the loop at all times.
You can now go ahead and make amends to your website in the same way as before.
You can now delete the files on the old web hosting server.
1. Prepare your domain transfer
Take a copy or screenshot of your current DNS settings. You'll find these settings in your domain control panel, or request them from your current domain administrator.
* Remember, don't make any changes to your DNS settings after you've provided us with the copy, as they might not get copied over during the transfer *
2. Initiate the transfer with matm
Let us know the domain name you want to transfer, and we will start the process on our side and provide you with an IPS Tag.
3. Update your domain's IPS Tag
Update the IPS Tag for your domain to the one provided.
This will start the transfer process, which can take anywhere from a few minutes to a few days
4. We verify the transfer
We will check that all of the DNS settings have copied over correctly based on the copy you provided in step 1
6. All set!
The domain has now been transferred and is being managed by matm
* Please note: Top-Level Domains names that are newer than 60 days or within 7 of expiry cannot be transferred in or out of 123 Reg or any other registrar. *
1. Prepare your domain transfer
Take a copy or screenshot of your current DNS settings. You'll find these settings in your domain control panel, or request them from your current domain administrator.
* Remember, don't make any changes to your DNS settings after you've provided us with the copy, as they might not get copied over during the transfer *
2. Get your authorization code (Auth Code)
For most domains, you'll need your authorization code (Auth Code) from your current domain registrar. This acts like a security key for transferring your domain.
You can find it by logging in to your domain control panel and looking for "Auth Code," "Transfer Code," or "EPP Code."
3. Initiate the transfer with matm
Let us know the domain name you want to transfer along with it's Auth Code, and we will start the process on our side.
I can take anywhere from a few minutes to a few days for the transfer to go through and the DNS Settings to propagate
4. We verify the transfer
We will check that all of the DNS settings have copied over correctly based on the copy you provided in step 1
6. All set!
The domain has now been transferred and is being managed by matm
Having an accurate picture of how your customers interact with your website is crucial. To achieve this, it’s necessary to exclude internal traffic, such as that of your employees, from your Google Analytics tracking. You can do this by excluding an IP address, such as that of your business location.
1. Find your IP address
Finding your IP address is easy. Simply visit https://whatismyipaddress.com/, and your IP address will show next to IPv4.
2. Excluding your IP address on Google Analytics
To exclude your IP address on the GA4 platform, you’ll need to have Administrator access to the account. Here’s how:
- Log into your Google Analytics account.
- Click the Admin icon in the bottom left hand corner
3. Select Data Streams under the Property menu
- Under Web, click on your website
- On the popup screen, click Configure tag settings
- Select Show all in the Settings box to increase the drop-down menu
7. Select Define Internal Traffic
8. Click Create
9. Decide on a Rule Name, for example: matm office
10. Set the traffic_type_value as internal
11. Select “IP address equals” from the drop-down menu under IP addresses and add your IP address in the Value box next to it.
12. If you have multiple business locations to exclude, click Add Condition to add more IP addresses
13. Click Create in the top right corner
Managing a LinkedIn Page efficiently requires assigning specific roles to team members so that various tasks such as content creation, page moderation, and analytics are handled smoothly by the right people.
In this guide, we will walk you through the steps to assign a LinkedIn Page to someone, complete with visual aids to make the process easy to follow.
Way 1:
Step 1: Log in to LinkedIn
Open your web browser and go to LinkedIn.
Log in with your username and password.
Step 2: Go to Your LinkedIn Page
Click onto your page and click on settings on the bottom left hand side
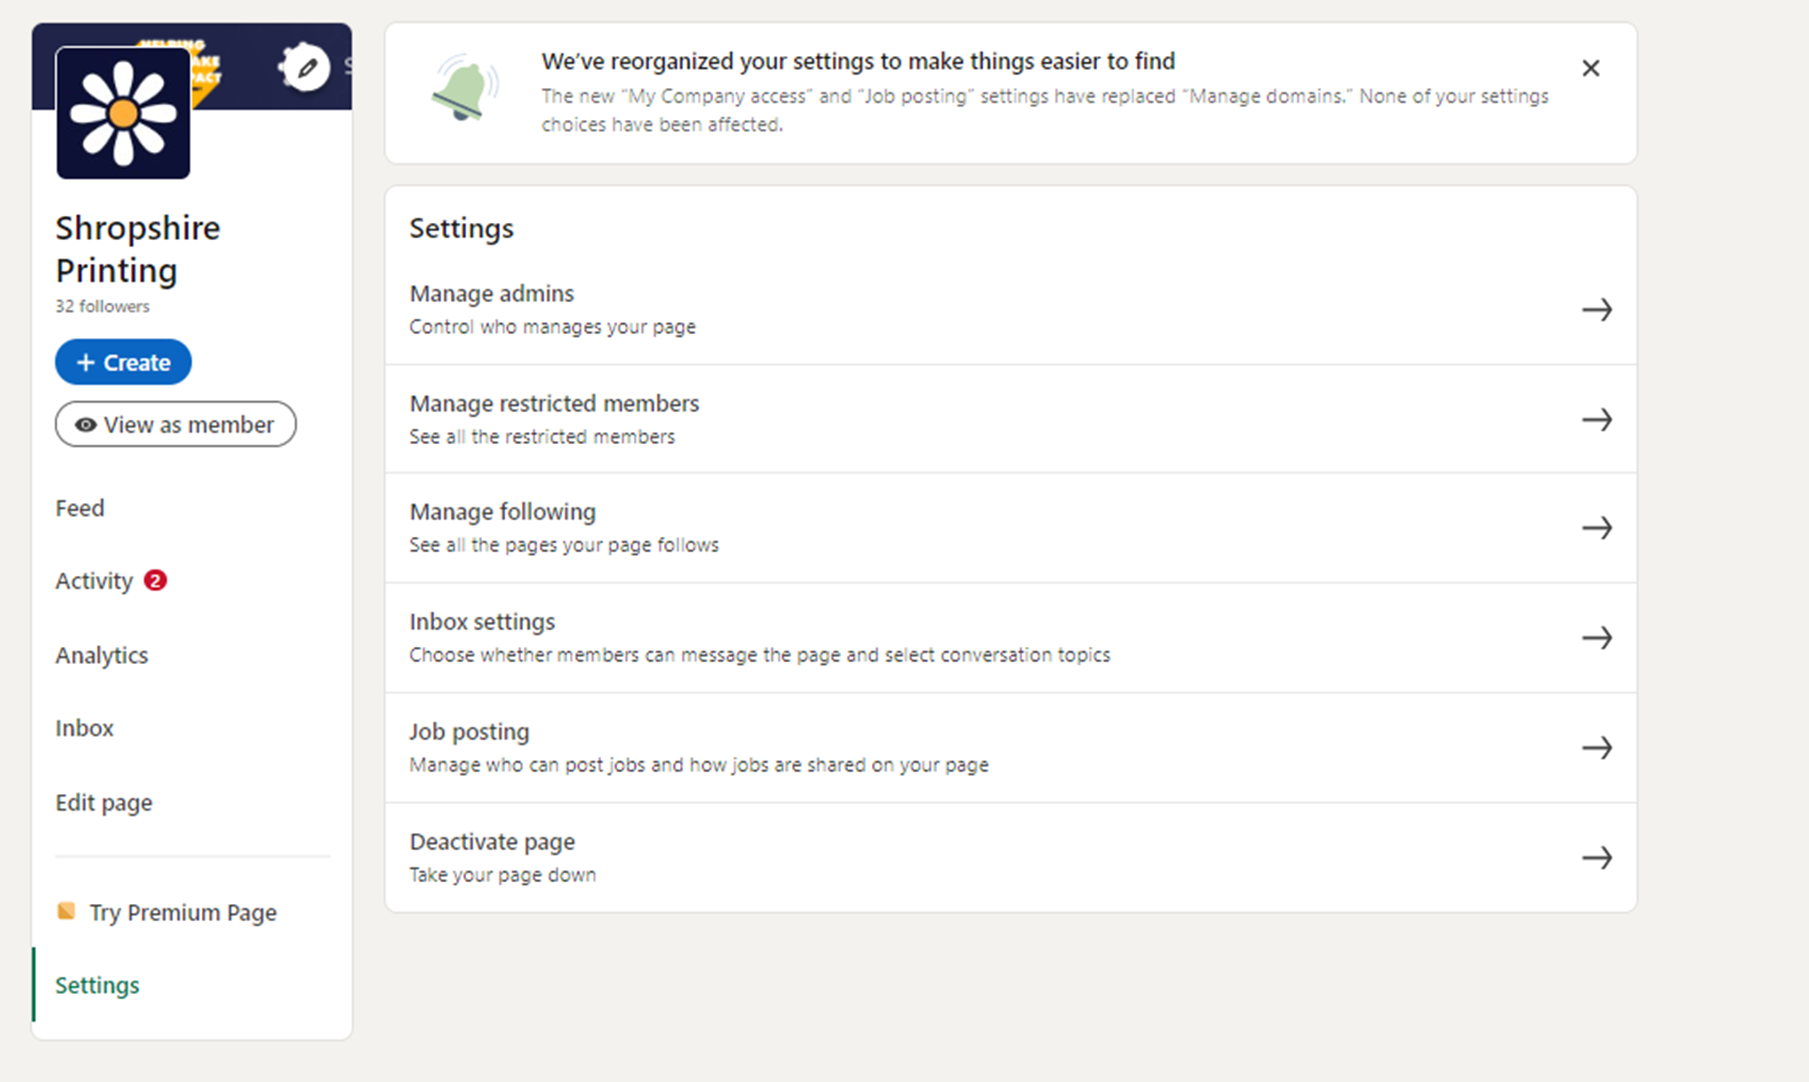
Step 3: Manage Admins
In the "Settings" menu, select "Manage admins".
Step 5: Add Admin
Click on the + Add Admin button
If you are wanting to add MATM make sure to choose Super admin

Step 7: Save Changes
Once you've selected the person and the role, click the "Save" button to assign the role.
Step 8: Confirmation
You should see a confirmation message that the admin role has been successfully assigned.
Additional Tip:
Make sure the person you are assigning as an admin is connected to you on LinkedIn.
Way 2:
- The people to be added must be invited to Business Manager and accept their invitation to join.
- The Page must be added to your Business Manager.
You can claim Pages your business owns or request access to your partners’ ad accounts.
Your
partners can share Pages with you.
- Sign in to Business Manager.
- Click Pages in the menu on the left side of the page.
- Click the name of the Page.
- Click Add people in the upper-right corner of the page.
- Use the checkboxes on the left side of the page to select people to add to the Page.
- Click the Assign roles button in the upper-right corner of the page.
- From the pop-up window that appears, switch the toggle buttons for the roles you need to
assign to the people for the Page.
[If you’re adding people to a partner’s ad account, you can select from roles based on the roles the partner assigned when the Page was shared to your Business Manager. - Click the Assign button.
Running a successful Facebook Page involves giving responsibilities to team members, so that each aspect of the page is well-managed. Assigning roles such as Admin, Editor, Moderator, Advertiser, or Analyst allows for a collaborative approach to page management.
This step-by-step guide will show you how to assign a role on your Facebook Page, making it simple and straightforward. Follow along to effectively manage your team and keep your Facebook Page running smoothly.
Step 1: Log in to Facebook
Open your web browser and go to Facebook.
Log in with your email/phone and password.
Step 2: Go to Your Facebook Page
Click on "Pages" in the left sidebar of your Facebook homepage.
Select the Page you want to manage from the list.
Step 3: Access Page Settings
Once you're on your Page, click on "Settings" in the left sidebar.
Step 4: Go to Page Roles
In the Settings menu, click on "Page Roles" in the left sidebar.
Step 5: Assign a New Role
In the "Assign a New Page Role" section, type the name or email of the person you want to assign a role to.
Select the role you want to assign from the dropdown menu (Admin, Editor, Moderator, Advertiser, Analyst).
Step 6: Save Changes
After selecting the person and the role, click the "Add" button.
Step 7: Confirmation
You might be prompted to enter your password again for security purposes. Enter your password and click "Submit".
The person will receive a notification about their new role, and you should see a confirmation message.
Additional Tip:
The person you are assigning as an admin has to have liked the Page.
What is an IP address?
An IP address is a unique identifier that identifies a device on the internet or a local network. It’s assigned to your device by your Internet Service Provider and is unique to your location.
An IP address is shown as a sequence of four numbers separated by dots, for example: 123.456.78.91.
What is FTP?
FTP stands for File Transfer Protocol – it’s a system for easily accessing other files of your website, and transferring them from one server to another.
What is DNS?
DNS stands for Domain Name System – it is the address book of the internet, telling computers which server to go to in order to view your website, or where to send your emails to.
What is DNS Propagation?
When changing DNS settings, it can take up to 24 hours for servers across the world to refresh and show those changes.
What is a website database?
A website database stores all of the dynamic content for a website, such as news posts, page content and site settings.
What is an IPS Tag?
An IPS tag, otherwise known as an Internet Provider Security tag, is a label that identifies domain registrars when administering domain name registration and DNS services.
You can manage your cookie settings through your browser’s privacy settings. Most browsers allow you to block or delete cookies, and some even offer more advanced settings for controlling how cookies are used on your device.
You can check which cookies a website is using by accessing your browser’s developer tools. Most modern browsers also offer an option to view cookies directly within the privacy settings, where you can see the cookies stored by each website you visit.
If you've received an email from Google warning you to take action regarding “Consent Mode”, it's crucial to address this promptly to avoid disruptions in your conversion tracking.
Here's what you can do:
Review Your Consent Mode Implementation: Check if Consent Mode is properly implemented on your website. This feature ensures that your Google Ads and Analytics can continue to collect data in compliance with user consent preferences.
Update Your Website's Consent Mechanism: If Consent Mode isn’t in place, you’ll need to update your website's cookie consent mechanism to ensure that it aligns with Google’s requirements. This may involve integrating a cookie management tool that supports Consent Mode.
Consult with Us: If you’re unsure how to proceed, reach out to us for assistance in setting up Consent Mode correctly.
Monitor Your Campaigns: After making the necessary updates, keep an eye on your Google Ads campaigns to ensure they are running as expected and that conversion tracking is functioning properly.
Taking these steps will help you maintain your conversion tracking and stay compliant with Google's policies and privacy regulations.
Consent Mode is a feature that enables your website to ask visitors if they consent to using cookies before these are stored on their devices. This is crucial for adhering to privacy regulations like GDPR and the PECR. Once set up, your website will only allow Google to store cookies and track users after they have given their consent.
Consent Mode is legally required under The Privacy and Electronic Communications (EC Directive) Regulations 2003 in the UK. To comply, you must:
Inform visitors that cookies are present.
Explain what the cookies are doing and why they are being used.
Obtain consent from users before storing cookies on their devices.
Google now mandates Consent Mode and may pause your ads if your website is not compliant with these regulations.
With Consent Mode in place, Google Analytics will only track visitors who have agreed to the use of cookies. This may result in slightly less accurate data if a significant number of visitors decline, but it ensures that your data collection practices are in line with privacy laws.
Consent Mode helps ensure your website complies with various privacy regulations, including GDPR in the EU and CCPA in the US, by requiring user consent before any tracking occurs.
To keep your AdWords campaigns running smoothly:
Implement Consent Mode on your website.
Make sure your AdWords account is configured to work with Consent Mode.
Consider using a cookie management solution (like a plugin) to handle user consent preferences efficiently.